In the fast-paced world of digital communication, efficiency and timing are everything. Whether you’re a busy professional juggling multiple tasks, a student planning your study reminders, or simply someone looking to optimize your email management, scheduling emails can be a game-changer. Microsoft Outlook, a leading email client used by millions worldwide, offers a robust feature set designed to enhance productivity, one of which is the ability to schedule emails. This guide will delve into the nuances of scheduling an email in Outlook, providing you with a step-by-step approach to mastering this feature.
Understanding the Importance of Email Scheduling
Before we dive into the how-to, let’s explore why scheduling emails in Outlook is a skill worth acquiring. The ability to schedule emails allows you to work on your messages at a time that suits you best, without having to worry about sending them out at the right moment. This can be particularly useful for coordinating with recipients across different time zones, ensuring that your email lands in their inbox at a time when they are most likely to see it and respond. Additionally, scheduling can help you manage your workload more effectively, allowing you to allocate specific times for email communication and thus reducing distractions during your peak productivity hours.
Step-by-Step Guide to Scheduling an Email
1. Composing Your Email
The first step in scheduling an email is, quite naturally, composing your message. Open Outlook and create a new email by clicking on “New Email” or pressing Ctrl + N. Draft your email as you normally would, filling in the recipient’s address, subject line, and the body of the email. If your email requires attachments, make sure to add them at this stage.
2. Accessing the Scheduling Options
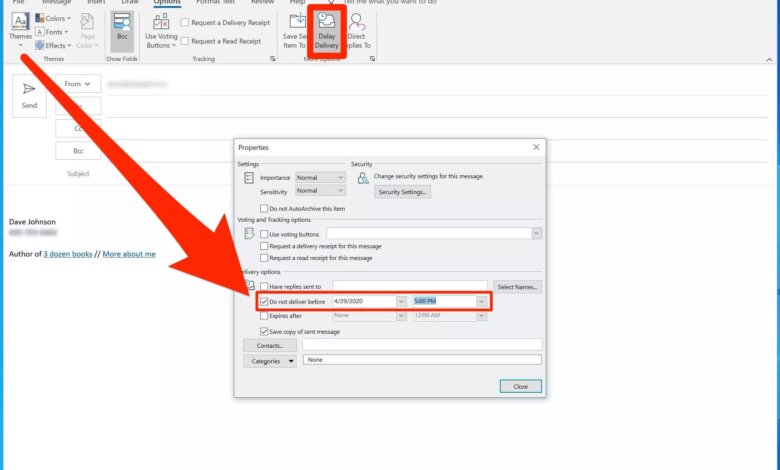
Once your email is ready to go, instead of hitting the “Send” button, look for the “Options” tab in the menu ribbon at the top of your email window. Click on it to reveal a set of options related to how your email will be sent.
3. Using the Delay Delivery Feature
Within the “Options” menu, you’ll find a feature called “Delay Delivery”. This feature is the key to scheduling your email. Clicking on “Delay Delivery” will open a new window with several settings related to the timing of your email’s delivery.
4. Setting the Delivery Date and Time
In the “Delay Delivery” window, look for the section labeled “Do not deliver before”. Here, you can specify the exact date and time you want your email to be sent. You have the flexibility to choose any future date and time that suits your needs. After setting your preferred schedule, click “Close” to return to your email.
5. Finalizing and Scheduling Your Email
With your delivery time set, you’re almost ready to schedule your email. Give your email one last review to ensure everything is in order, then click the “Send” button. Instead of sending immediately, Outlook will hold onto the email and automatically send it at the scheduled time.
Tips for Effective Email Scheduling
While scheduling an email in Outlook is straightforward, there are a few tips that can help you make the most of this feature:
- Time Zone Awareness: Always consider the time zone of your recipient when scheduling emails, especially if they are in a different part of the world.
- Clarity in Communication: Since your email will be sent later, ensure your message is clear and unlikely to require immediate clarification or follow-up.
- Managing Scheduled Emails: Keep track of your scheduled emails by going to your “Outbox” folder. Here, you can see all emails waiting to be sent and make any necessary adjustments before their scheduled delivery time.
Conclusion
Scheduling an email in Outlook is a powerful feature that can enhance your communication strategy, allowing you to send messages at the most opportune times without being tied to your computer. Whether you’re looking to improve your time management, communicate more effectively with colleagues in different time zones, or simply want to plan your communications more strategically, mastering the art of email scheduling in Outlook is a valuable skill. By following the steps outlined in this guide and incorporating the tips provided, you’ll be well on your way to becoming proficient in scheduling emails, thereby boosting your productivity and enhancing your digital communication efforts.